Who doesn’t want to save money? Templett is an awesome online app you can use right in your browser without downloading ANYTHING!
Read on for a step by step video tutorial on inserting your photo for a unique DIY Christmas Photocard.
This post and the photos within it contain affiliate links. If you purchase something through the link, I may receive a commission at no extra charge to you. Full disclosure here.
First off, you can purchase so many template options in the ETSY marketplace. While this post focuses on using Templett online app, some shops sell templates for Photoshop templates (for photographers & creatives who know how to use Photoshop, see my post here on using photoshop templates), while others use Corjl app.
This tutorial is specifically for Templett app photo cards. My shop for Templett Christmas photo cards can be found here.
The only requirement is you have to edit using your desktop computer or laptop. At the time of the writing, you aren’t able to use your phone or tablet to edit your information. Sorry. Maybe things will change in the near future. Hopefully. J
Once you purchase the template, you will be sent a login from Templett. Sometimes it ends up in your spam or junk folder so be sure to look there. If you don’t have the original email link from Templett, you can still access your templates using the ETSY order number and the email associated with ETSY.
You can watch the video below or read the step by step instructions beneath the video.
Step 1
Once login is successful, you will need to click on the “templates” icon to access your purchased templates…see below.
Step 2
You can now see all the templates you purchased appear. Simply click on the template you want to edit. If you already have a Templett account, maybe you purchased a previous Templett template, your new template will be added to your account library.
Step 3A - for most of my photo card templates
Upload your image.
Click on “Elements”, then “new elements”.
It will prompt you to find your image from your computer files and ask you to insert a tag name. I usually use a brief description. After doing so, you can click on the “add” button. Depending on the file size, it may think for a few seconds, then say “element added” with a check mark.
Then you can go back to the “elements” icon and you should see your image in the library.
Click on the image and it will appear in your template.
You can scale the image up or down using the upper or bottom corners. Once it’s the size you like, you need to send the photo back behind the artwork using the “send backward” icon.
Click on the text box to edit in your family name. The text box should have blue squares at each corner and along the midpoints. Resize by adjusting using the corner square while holding down “command” for mac users or “control” for pc users on your keyboard. Be sure to use the combination to get a scaled proportion adjustment.
You can add an additional text box, by clicking on the “text” icon and typing within the text box.
You can change the font if you prefer something else by clicking on the font for the drop down options.
Step 3B - for my more complex watercolor photo cards in which the artwork is large
Upload your image.
Click on “Elements”, then “new elements”.
It will prompt you to find your image from your computer files and ask you to insert a tag name. I usually use a brief description. After doing so, you can click on the “add” button. Depending on the file size, it may think for a few seconds, then say “element added” with a check mark.
Then you can go back to the “elements” icon and you should see your image in the library.
Click on the image and it will appear in your template.
You can scale the image up or down using the upper or bottom corners.
Once it’s the size you like, you need to send the photo back behind the artwork using the “send backward” icon. IMPORTANT — due to the layers involved with my more complex designs, keep clicking on the “send backward” icon until your images is under the frame layer as well as the text and artwork layers.
Click on the text box to edit in your family name. The text box should have blue squares at each corner and along the midpoints. Resize by adjusting using the corner square while holding down “command” for mac users or “control” for pc users on your keyboard. Be sure to use the combination to get a scaled proportion adjustment.
You can add an additional text box, by clicking on the “text” icon and typing within the text box.
You can change the font if you prefer something else by clicking on the font for the drop down options.
IMPORTANT — IF YOU NEED TO MOVE THE IMAGE/SHIFT UP OR DOWN OR LEFT OR RIGHT, YOU WILL NEED TO MOVE THE ARTWORK LAYER FIRST — SEE VIDEO around 2:45 mark. WHEN YOUR IMAGE IS IN THE CORRECT LOCATION YOU CAN SHIFT THE ART WORK LAYER BACK IN THE ORIGINAL POSITION.
Step 4
Once all editing is complete and you’ve checked the spelling, you need to SAVE your changes. DOUBLE CHECK YOUR SPELLING AS THERE IS NOT A SPELLCHECK in the Templett system at the time of this writing.
When you’re ready to download, click “download” which will prompt you to select from the dropdown menu…pdf, jpeg, and png options.
If you plan on using a professional printer,most prefer a print ready formatted pdf with bleed all around. To download that option, see below…you need to select the “show bleed” then “create pdf”.
If you plan to use a professional printer, I recommend Prints of Love. My shop has partnered with them to offer fast, high quality yet affordable printing. Plus free 2-3 day U.S. shipping and free envelopes!
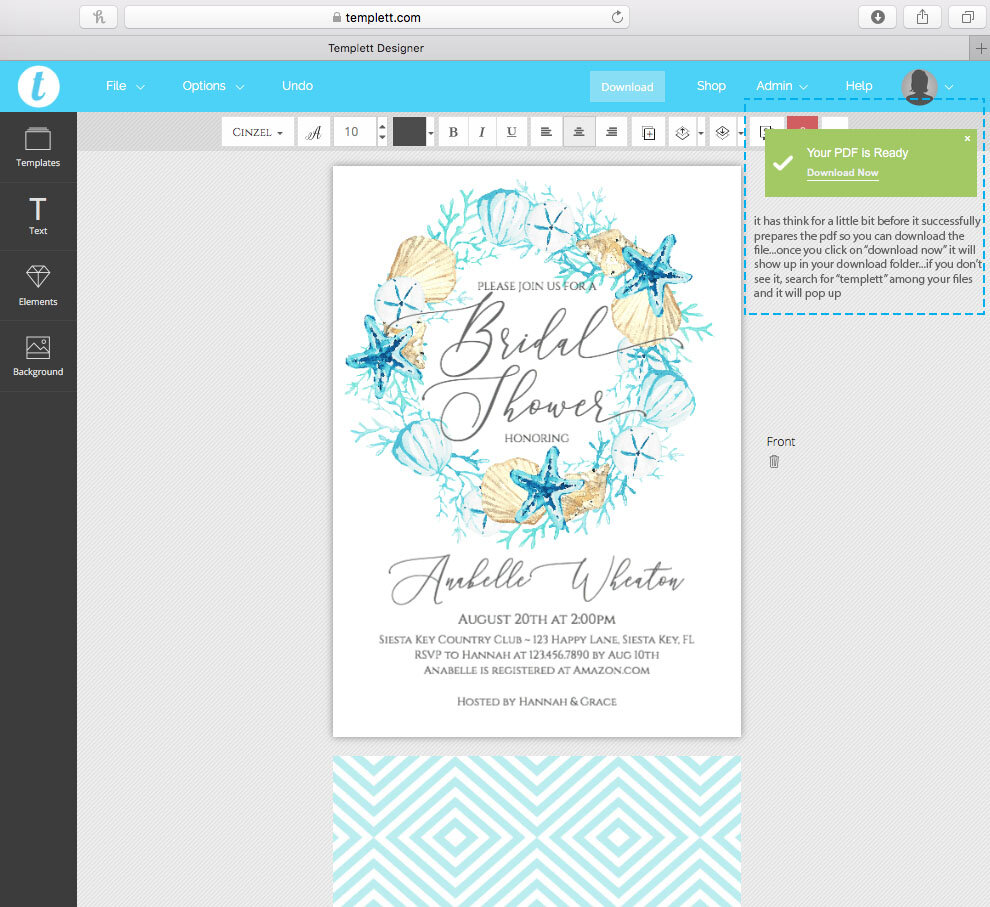
Templett will think for a few minutes while it prepares the file. Once it’s ready, it will show the prompt in the upper right hand side of your window…see below. Click on “download now”. You will be able to find it in your download folder. If you don’t see it, you can search for “templett” among your downloaded files and it will appear.
If your print vendor prefers a jpeg format, downloading in a jpeg format is what you’ll want to select. I would select the 300 dpi for high resolution.
If you plan on printing at home and saving paper with a 2 per page formatthat you trim yourself, you will need to select, “download”, “pdf” then make sure “show bleed”, “show trim marks”, and “save paper” have been selected before you select “create pdf”.
Once the download is ready, click “download now”. You will see the 2 per page format…see below. When printing yourself, use white card stock paper and use the front trim marks as a guide to trim the invitation down to the finished size. I recommend A7 envelopes like these, which you can also customize and print the recipients names as well as your return address. See here to the tutorial.
If you plan on posting to your social media, or emailing, or texting, downloading in a jpeg format is what you’ll want to select. I would select the 300 dpi for high resolution.
Hopefully my video tutorial has helped you edit your template.
In case you missed it, check out the Templett tutorial series…
Part 1…How to edit and print a template using Templett
Part2…How to Add a Photo to your Photocard template using Templett
Part 3…How to edit and print envelope templates using Templett
Part 4…How to edit and print place card templates using Templett
Happy designing!
Gibb